Almost all users who have migrated from Windows to macOS look with bewilderment at the standard photo viewing options. After all, here you can’t just open and scroll through the images - everywhere there are some incomprehensible nuances. In this article, we will talk about how to properly work with navigation when viewing images using regular macOS tools, and also offer several options from third-party developers.
In general, as conceived by the developers from Apple, we should all use the Photos application. But you, just like the rest of the majority, may simply not understand why you need to constantly import something somewhere, create separate albums and at the same time run a separate application, if everything can be viewed in Explorer, where the files are sorted into folders by hand.
Opening an image in Finder launches the Preview application. Scrolling through the photos with arrows in this way will not work. There are two options for getting out of the situation:
1) Select all images in the Finder (use the shortcut Command (⌘) + A) and press the space bar on your keyboard. You probably know that the space bar launches the Quick View application, which allows you to view almost any file without launching specialized programs with which they are associated. In the "Quick view" you can switch photos with arrows.

And if you press the Command (⌘) + Enter (Return) key combination in the Quick View mode, you can open a preview of all selected images for quick navigation and switching between them.

2) Select all or required images for viewing and start slideshow mode. To do this, hold the Alt (Option ⎇) key and open the menu File → Object Slide Show ... or just remember the keyboard shortcut Command (⌘) + Alt (Option ⎇) + Y. If you want to manually switch images, then just pause the slideshow and use the arrows on your keyboard or trackpad.

And there is also a very convenient option "Index-list" (an icon with squares). By clicking on it, you can see a grid of all images and quickly find and switch to the required one.

If all the described methods of solving the issue of viewing images with regular means seem too complicated for you, we suggest downloading and enjoying software from third-party developers.
An ultra-simple and minimalistic program that copes with viewing at 100%. Just associate all the image formats in it and by double clicking on any photo in the folder you can either use the arrows or use the trackpad to navigate.

Many will like the fact that all interface elements are hidden and the image opens almost to the full screen (like QuickTime opens a video). An additional menu with information can be viewed by moving the cursor to the right edge of the window. You'll also enjoy rotating or zooming photos with trackpad gestures.

LilyView even opens GIF animation without any problems. And there is also a built-in utility for controlling Philips HUE smart bulbs.

Another high-quality viewer for macOS. Simple, clear, compact and quite easy to use. There are also no functions for editing images (except for the possibility of crop), but there is Russian localization. The developers provide the right for a month for free, and only then they will offer to buy a license (299 rubles).

Not much different from Hee image viewer. The main advantage is that it is free and has a wide range of tools for customizing the program to suit your needs. Very fast and convenient.
Download JustLooking (official website of the developer).
Be sure to tell us about your favorite programs or ways to view images on Mac in the comments.
According to yablyk
To view photos on a MAC, you need to use a standard program designed for this, or download another one. We will look at some of the most convenient ways to view images.
Any computer with the MAC operating system has a standard program - an image viewer.
To use it, do this:


As you can see, even the standard viewer allows you to quickly view and run slideshows. But there are a number of applications that provide even more options.
A fairly simple program that allows you to run slideshows with the interval and speed of displaying pictures. The speed of the program is quite good, even on older versions of MAC OS.
Interestingly, CocoaSlideShow will work for the Apple Remote.
At the top are all the necessary buttons. They allow you to add files to the collection for display, put labels, rotate left and right, or delete an image.
Also, if there is metadata in the file description, they can be displayed in Google Map. But the main thing is that CocoaSlideShow allows you to conveniently view photos.

This program is made in a minimalist style and has absolutely nothing superfluous. However, for some users, the FFView functionality is still not enough.
Here you can add photos to the collection for further display, remove them from there or clear the library.
Also, users have the opportunity to view the description and some data about the picture. But the most interesting thing is that FFView has a magnifying glass feature. This is a very interesting thing that allows you to see the smallest details of the image.

The JustLooking program fully corresponds to its name. In it, in fact, there is only a function for viewing pictures and nothing more. True, the pictures here can be rotated to the right and left, as well as enlarged and reduced, which is important.
Users can also edit the picture library, run slideshows and simply scroll through the pictures in the collection. This application is very suitable for children, the elderly and users with poor eyesight. The fact is that all the buttons here are large and intuitive.

And this is already a much more functional program than all the previous ones. But it will suit only professional photographers and people who work in the field of image processing.
The fact is that Phoenix Slides allows you to view a variety of data about a particular picture. So you can see its resolution, light source, aperture that was used when shooting, size and much more. When viewing, you can zoom and rotate pictures.

Choose the program that you like the most!
I had XnView installed on my Windows computer, so I stuck with my habit and installed it on my Mac as well. But soon curiosity got the better of prudence and I started looking for alternatives to this viewer. We will not take into account the standard system viewer, due to some inconvenience of use, and we will not describe various catalogers and photo browsers that we came across on the net.
The first app to come into view xee.
The application turned out to be quite functional, with a lot of settings and a pleasant interface, the number and arrangement of elements of which can be customized to your individual taste. Key management can also be set in your own way. By enabling and disabling certain buttons, you can customize the program so that there is no trace of the feeling of working on a Mac. It's like being back in Windows. The only negative that significantly spoiled the pleasant experience of using this application is the incorrect reproduction of colors and real sizes of some image formats.
Download Xee
JustLooking.

The application of the so-called "middle hand". He knows no more, but no less than what he is supposed to. It has a moderately minimalistic interface in the style of Apple. Attention to the controls is attracted mainly by large buttons of a beautiful shape, located in not entirely expected places. The slideshow mode is pleasant in its own way: nothing distracts from viewing your favorite images, and the controls in this mode become transparent and unobtrusive. Of the minuses, some users will want to note the lack of initial image processing tools, but in my subjective opinion, this is not such a significant drawback, because .
Download

A program familiar to many Windows users, released under the poppy. A wonderful viewer that has the functions of cataloging and editing images. The rich functionality is justified by the high cost of ≈ $170. Therefore, the viewer is "not for everyone": if you have money - then you can afford to buy such an application, if not - use Xee or XnView.
What we start with, we end with. XnView.

Perhaps the most convenient and familiar to the former "inhabitants" of Windows is an image viewer. It has a photo browser function and is quite easy to set up and use. In terms of the location and configuration of controls, XnView is a related group with Xee: before that, the principles for setting up their interfaces are the same. It has a nice interface, with intuitive controls and an extensive settings menu. It is possible to use smoothing of images when they are enlarged. Mac OS 10.4 Tiger users are offered an extremely poor and, apparently, antediluvian version of the application. In order to avoid damage to nerve cells, we strongly do not recommend installing this application on the Tiger.
Download version for Mac OS 10.5 Leopard .
By the way, fellow Mac users, we have written a couple more articles about Mac applications especially for you:
I hope that we will help you choose exactly those applications that you will use with pleasure.
::
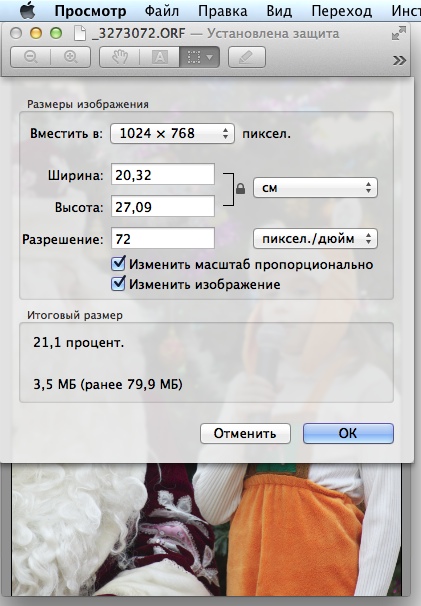
By moving the controls, I literally in half a minute, it seems to me, improved the look of the picture (on the left is the “Before” picture, on the right is “After”): Naturally, the program allows you to crop a photo. To do this, take the selection tool (rectangle), mark the desired area and give the command Tools –> Crop: You can reduce a photo for posting on a website or sending it by mail by opening the size settings panel: Here we choose one of the standard formats or specify the one we need. You can also specify what permission will be written in the file. First, although we can zoom in and out of the entire photo, sometimes it's convenient to view a part of it. To do this, there is a “Magnifier” in the Viewer. It can be instantly turned on (and off) by pressing the "`" key (it is located between the left Shift and Z). But English layout must be selected- it won't work in Russian. The second is special selection tools. We select them from the drop-down menu of the toolbar: "Smart Lasso" allows you to select an object with a sufficiently contrasting border, if - not even too carefully - you pass over it. But even more interesting is the Transparency Function. Its principle is similar to the "magic wand" in graphic editors. But the implementation is much more convenient. By “dragging” the mouse with the button pressed over the surface of approximately the same shade, we see in real time how the selected part of the image changes. Here is such a system program View! And you still ask why I like Mac OS X? 😉

 Perhaps the listed set of funds in many cases will be more than enough. But here's something else...


